Using Zoom in studies
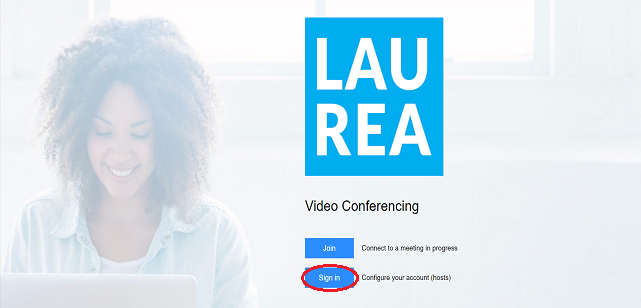
Log in to Zoom via your browser by clicking Sign In and using your Laurea credentials. When you sign in with Laurea credentials you will have an Education license available.
Students can host meetings with up to 500 participants. For larger-scale webinars you can use Teams. Meetings have no time limit. You can be the host in only one meeting at a time.
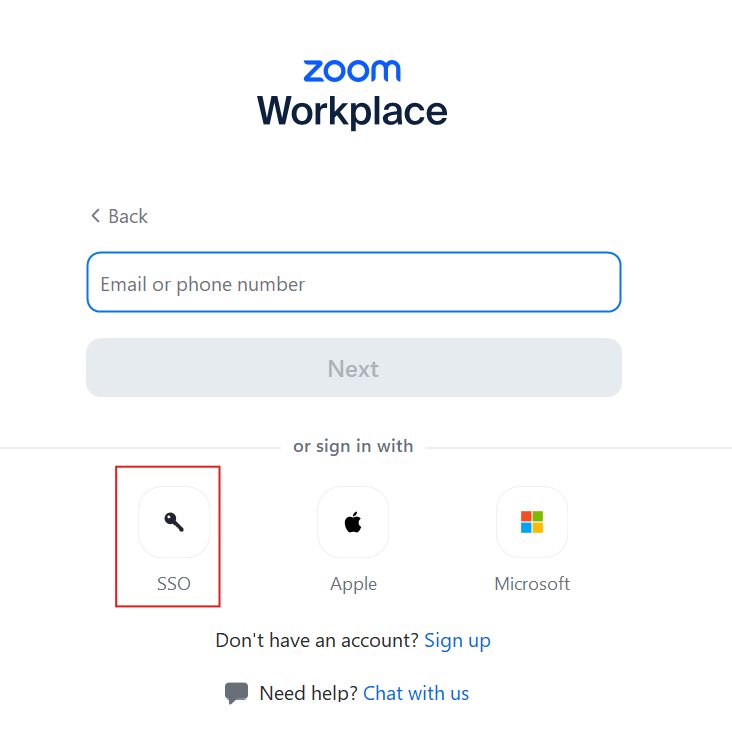
Use the SSO sign-in option for signing in to the Zoom desktop application. This directs the sign-in to Laurea user credentials.
Always join meetings using your full name. You can change your name in the participant list after joining by right-clicking your name, selecting the three dots and choosing “Rename”.
Protect the meeting either with a waiting room or a passcode.
General English-language instructions
Joining a meeting
You do not need an account to join Zoom meetings. The primary way to join is to click the provided link. These are commonly of the form https://laurea.zoom.us/j/3147613480, but may also contain letters for a personal meeting room, like: https://laurea.zoom.us/my/henrinhuone.
Joining on a computer
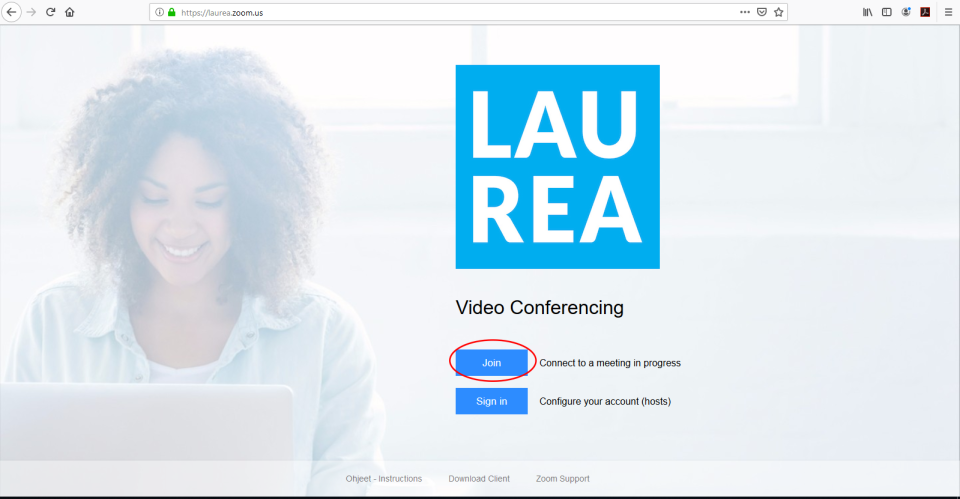
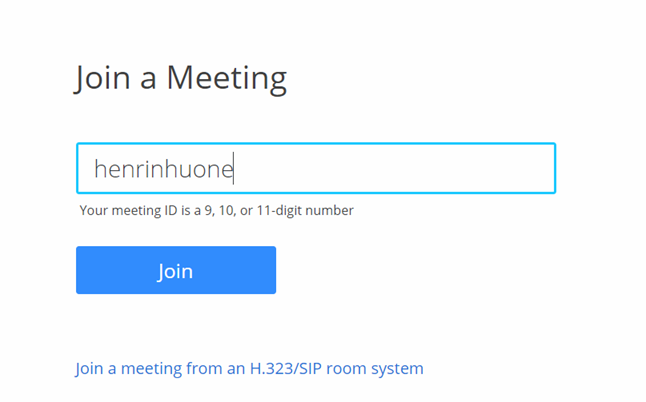
To join a meeting without a link, go to https://laurea.zoom.us. The address opens Laurea Zoom’s start page. Press the Join button to join a meeting:
On the next view enter the meeting ID into the text field. The ID can be found at the end of the Zoom link: https://laurea.zoom.us/j/3147613480
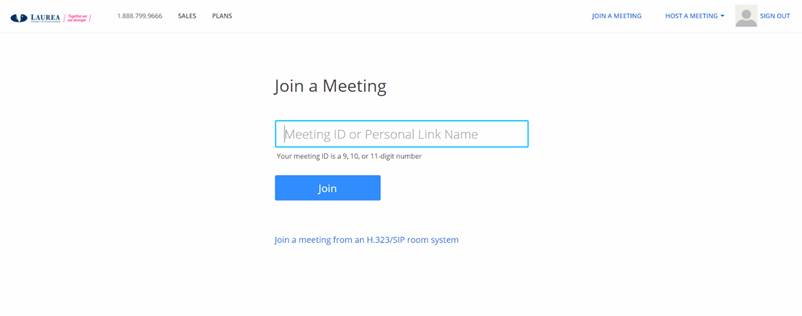
You can also join personal meeting rooms by using their personal link names (Personal Link Name). If you have received such a name, for example “henrinhuone”, you can join directly by entering it into the text field.
If you are logged into Zoom, you can also join a meeting using the meeting ID or name from the Join a meeting button located at the top right:

If you join a meeting for the first time or from a new device, Zoom will ask you to install the Zoom application. Download the application to your computer, open your downloads folder and install the Zoom application. After installation you should automatically be taken to the Zoom room. If this does not happen, try joining the room again after installing the Zoom application.
If you cannot or do not want to install the application on your computer, you can join the meeting via your browser by selecting “Join from Your Browser”. This feature works best with up-to-date versions of Microsoft Edge, Mozilla Firefox and Google Chrome.

Joining a meeting in a browser
Zoom’s own instructions are available here.
You may be able to join a Zoom meeting directly in the browser without installing the Zoom app.
NOTE! This works only with the Google Chrome browser, so you need it if you want to join via the browser. Also, on mobile devices you can only join meetings via the Zoom App.
When you join a meeting via the browser (for example via the meeting URL), the following window opens:
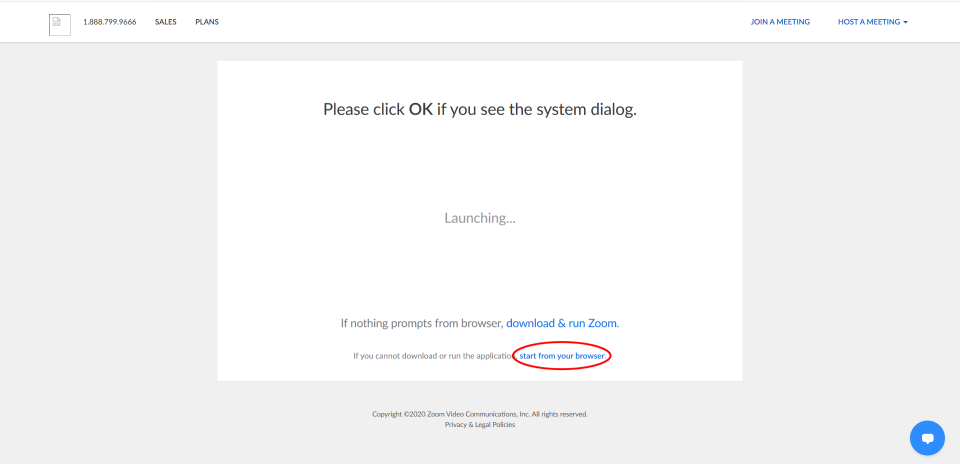
From this page you can start the meeting directly in the browser by selecting “start from your browser”.

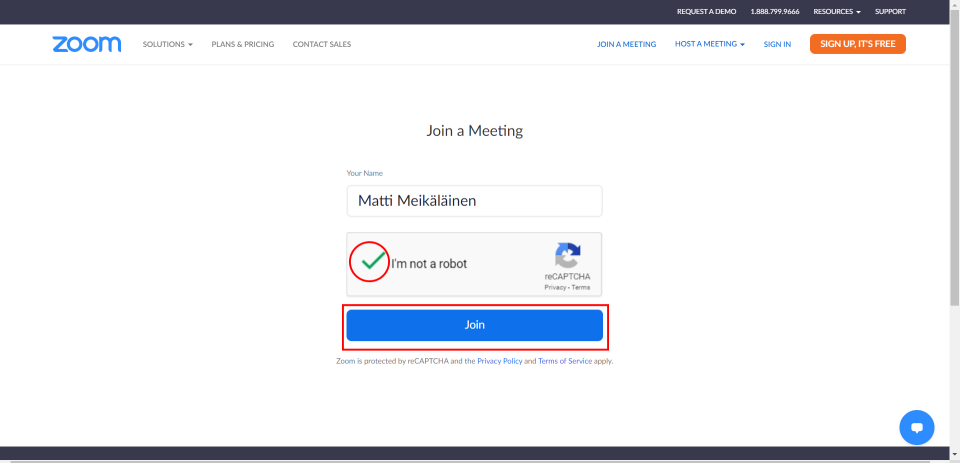
On the new page enter your first and last name, select “I’m not a robot” and finally join the meeting by selecting “Join”. On the next page select “I Agree” to proceed to the meeting.
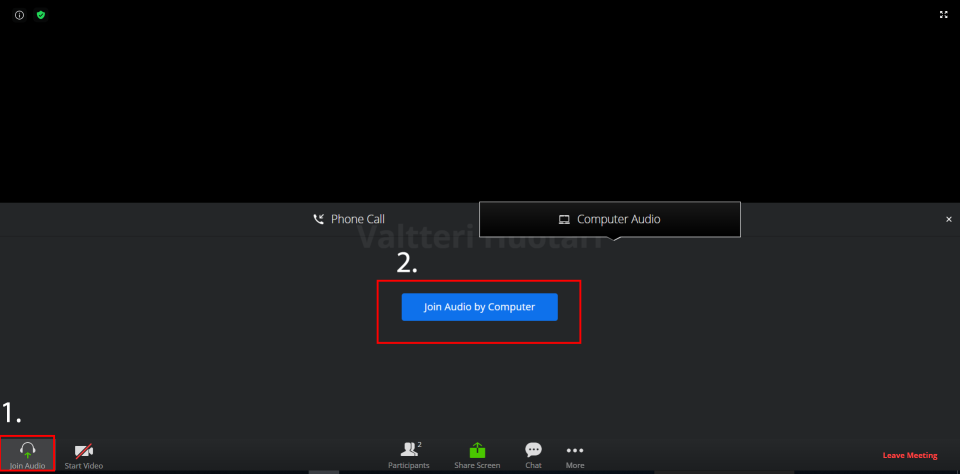
After joining select “Join Audio by Computer” to connect your computer’s audio devices to Zoom.
NOTE! Connect your audio devices to your computer before joining the meeting.
Joining on mobile devices
Mobile devices require the Zoom App to join meetings.
For Android devices: https://play.google.com/store/apps/details?id=us.zoom.videomeetings&hl=en
For Apple devices: https://apps.apple.com/us/app/zoom-cloud-meetings/id546505307
Hosting a meeting
Recurring meeting room
It is possible to create meeting rooms in Zoom that are stored under the user’s ownership. Each Zoom meeting room has its own address whose link can be used to join the room. Recurring Zoom meeting rooms can be reused, allowing participants to use the same link as before.
First sign in at laurea.zoom.us (Sign in).

Then click Meetings from the left panel. From this view you can manage your meeting rooms. You can create a new meeting room by clicking the “Schedule a New Meeting” button.

This opens the following view where you can set and edit your meeting room details and settings:

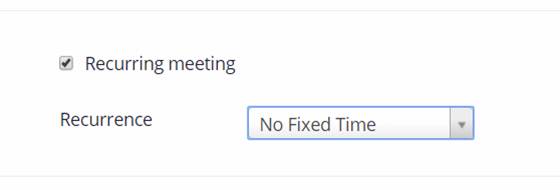
To make the meeting recurring, check the Recurring meeting box. You can set how often the meeting recurs using the Recurrence menu (Daily, Weekly, etc.). Use the “Repeat every” menu to specify more precisely when the meeting repeats (every day, every other day, etc.). Use the End date to specify when the room usage ends either by date (By –/–/—-) or by number of occurrences (After – occurrences).
If you want to use the same room for a long time and/or without a specific time limit, choose No Fixed Time from the Recurrence menu. In this case the room remains available until you change it.
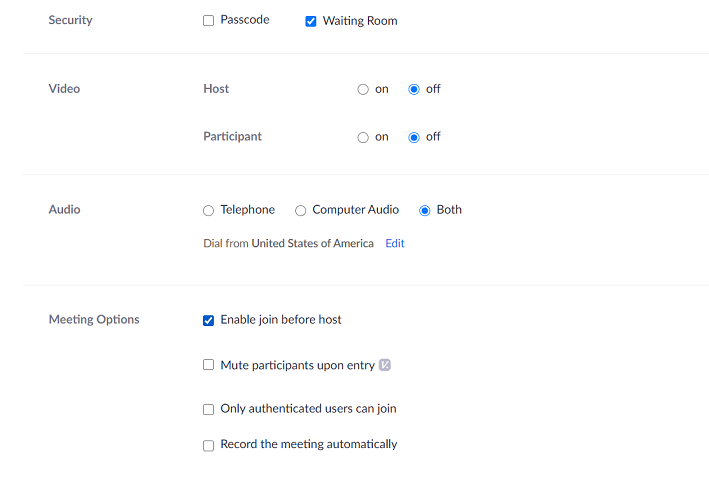
If you want the room to be available without your presence, enable the “Enable join before host” option under Meeting Options:
Then anyone who has the room’s URL link can join the room at any time.
If multiple hosts are defined for a meeting, the first person who has Host rights becomes the meeting Host and the others become Co-Hosts. If a predefined person does not receive the rights, they must first sign in at https://laurea.zoom.us/ and start the Zoom meeting again.
Note! Meetings now require either a passcode or a waiting room.
You can predefine alternative hosts (Co-Host) for recurring meeting rooms using the “Alternative Host” field. Enter their user IDs in the HAKA username format username@laurea.fi, e.g. otthuus@laurea.fi, into this field. If there are multiple alternative hosts, separate the IDs with commas:
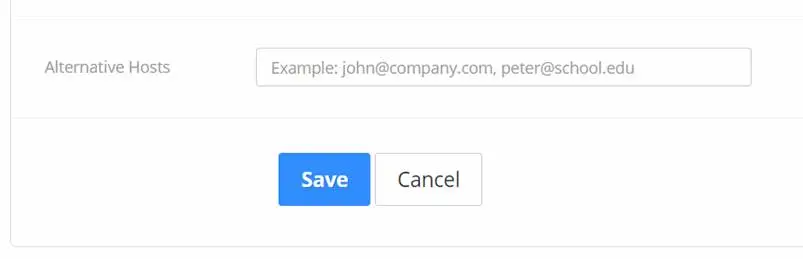
Remember to click the Save button at the bottom so your room is stored in the system. A teacher must sign in once at https://laurea.zoom.us before you can add them as a Co-Host.
After saving you will move to the next view where you can see your room details. From there you can also start the meeting, add meetings to a calendar, join the meeting or send invitations:
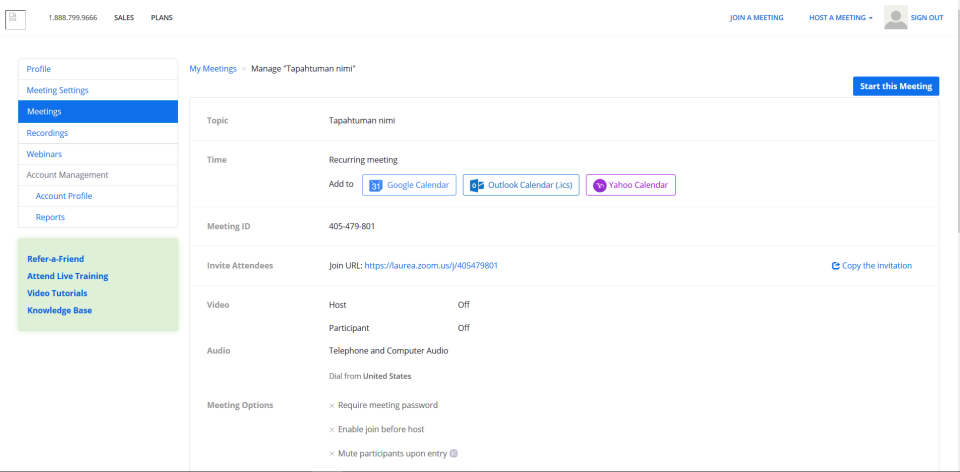
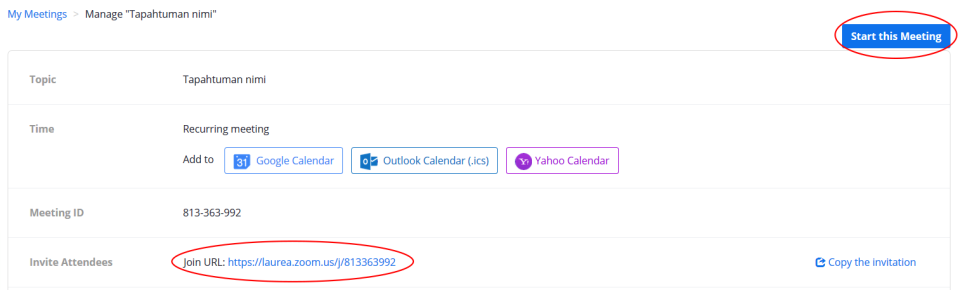
You can join the room yourself by clicking the “Start this Meeting” button, or by opening the room’s personal URL link.
NOTE! Each room has its own personal address and link. Make sure your guests know the link (URL) for the room you use for the meeting.
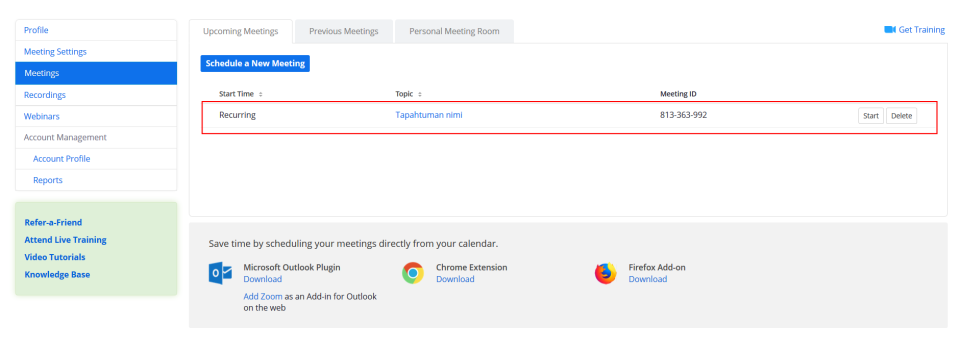
After saving, your room can always be found under the Meetings section of your profile, below the “Schedule a New Meeting” button.
Quickly created one-time meeting room
A quickly created one-time meeting room exists as long as there are participants or the host present. Each quickly created meeting room has a personal address and link that are invalidated after the room is used. Quickly created meeting rooms are not stored in the Zoom system. You can create one-time meeting rooms in Zoom via your profile or by creating a Zoom meeting from Outlook.
If you are already signed in, you can host a meeting by pressing the “Host a meeting” button, where you can directly specify whether video is on or off.

NOTE! The “Host a Meeting” button creates a one-time meeting room with its own address and link (URL). This meeting room is separate and not connected to the meeting rooms that have been created and saved in the system.
Adding participants during the meeting
When you start or join a meeting in Zoom (with your camera off), the Zoom application opens a meeting view with many meeting-related features.
To invite additional participants to the meeting, click the “Participants” button at the bottom (it appears when you move the mouse over the window) and then the arrow in the top corner, or click the large “Invite Others” button from the right:
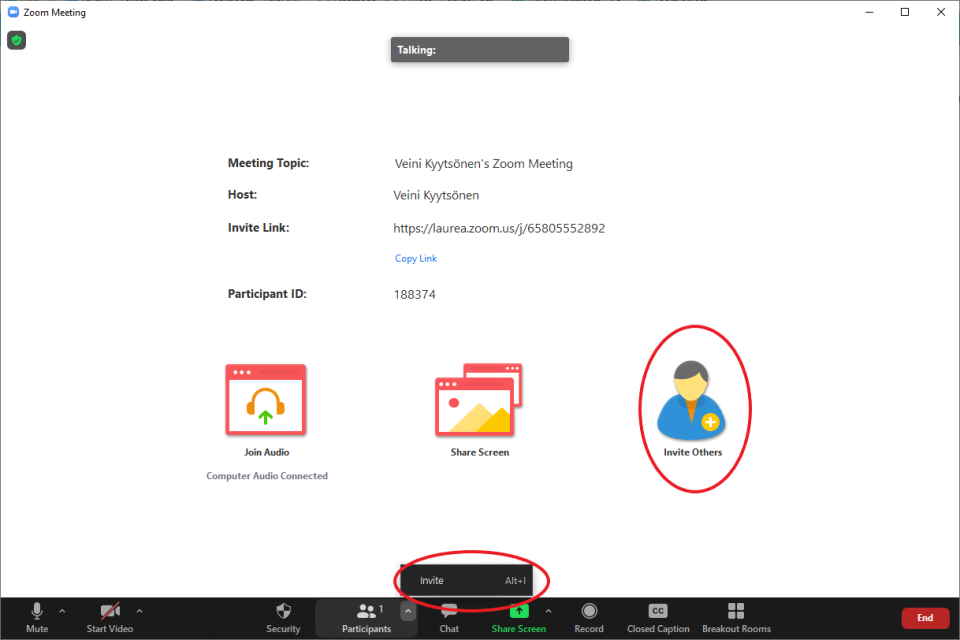
Both of these buttons open a new window:
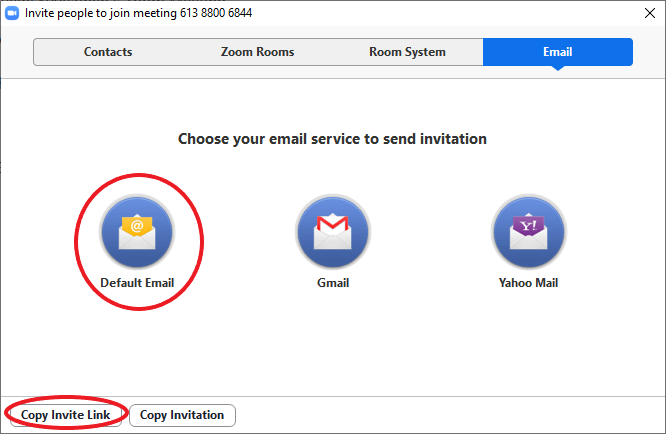
From that window you can invite new participants to your meeting. The leftmost “Default Email” icon in the center allows you to send the invitation link via Outlook to your selected contacts. This button opens Outlook with a shareable message, so you only need to choose the recipients.
At the bottom left you will find the “Copy Invite Link” button, which copies the meeting invite link for your use. A similar “Copy Link” button can be found on the meeting’s front page next to the Invite Link.

“The host has another meeting in progress” notification
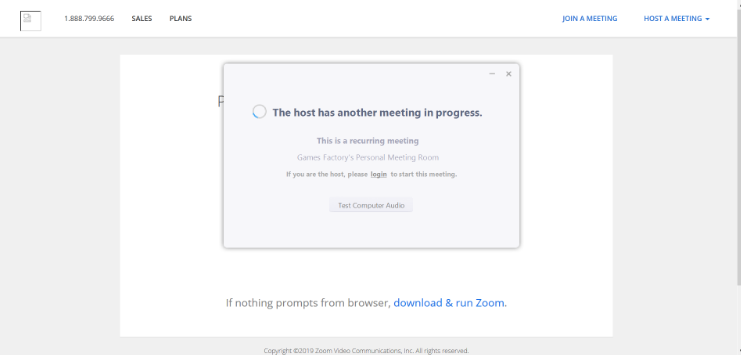
This notification appears because the host has previously given students/teachers/participants the link to an already created/personal Zoom meeting room, but the host themselves has started another meeting room.
Simply put; the host is in one Zoom room and the other people are in another Zoom room.
This happens if, for example:
- The host has created and saved a recurring discussion room (or a personal room) with a specific address and link (URL)
- They have then shared that address link with participants
- But they then try to start the meeting using the front page “Host” button, which creates a separate one-time Zoom meeting room and assigns it its own personal address and link (URL)
An instructional video on hosting a meeting can be found here (English).
Recording a meeting
Zoom’s own support page on recording meetings can be found here.
Recording a Zoom meeting to video.laurea.fi service (Kaltura)
First make sure you have logged in at least once to the Video.laurea.fi service at: https://video.laurea.fi/. This way the recording you create will be stored in your media on the service.
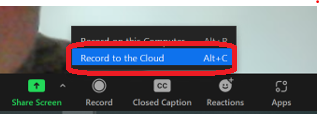
Start recording from the bottom bar by pressing the Record button.

Select Record to the cloud.
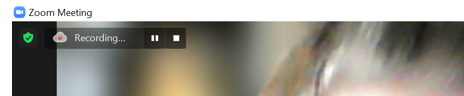
In the top-left you will see that recording is in progress. From there you also get pause and stop buttons.
These buttons are also available in the Zoom bottom bar.

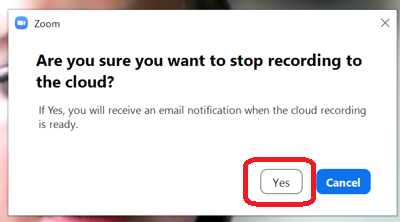
When you press the Stop Recording button, a window asks if you are sure you want to stop recording to the cloud. If your video is ready, press the Yes button.
You will receive a notification at the top-right of the screen that you will receive an email when your recording is available.
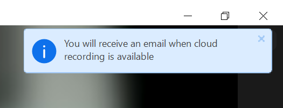
End the meeting and wait for the email notification.
Note! The time from stopping the recording to the recording being ready usually takes at least as many minutes as the length of the recording. For example, for a three-hour recording expect to wait at least three hours.
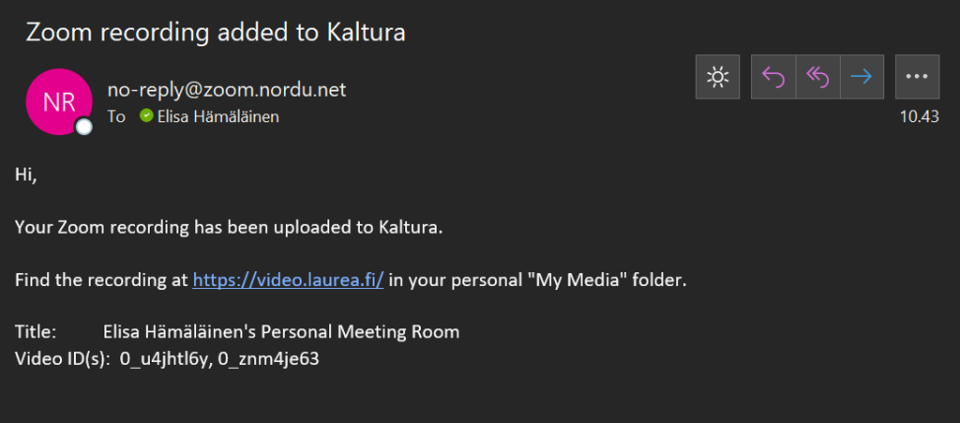
The incoming email will look like this and includes a direct link to Kaltura: https://video.laurea.fi/
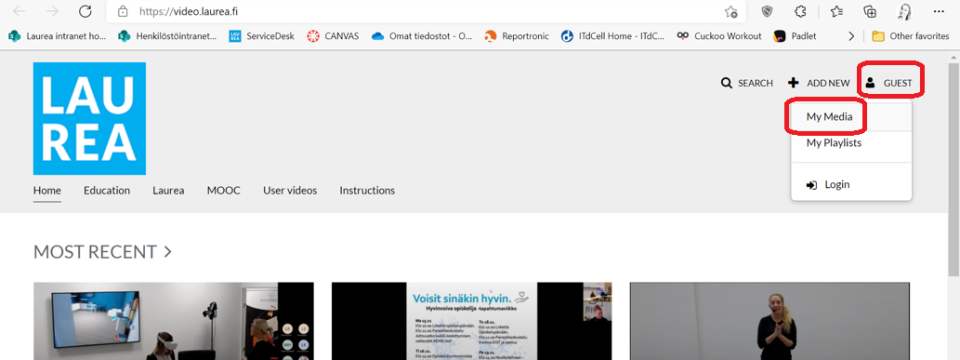
In Kaltura you will find the recording under your own videos – click the Guest icon at the top right and select My Media.
Note! A Zoom meeting generates two separate recordings in the video.laurea.fi service; one containing both audio and video, and another containing audio only (with a black screen).
Recordings always go to the host’s account.
In the video.laurea.fi service (Kaltura) the recording is automatically in “Private” mode, meaning the video is visible only to you. If you want to change the sharing settings, click the pencil icon (Edit) on the right.

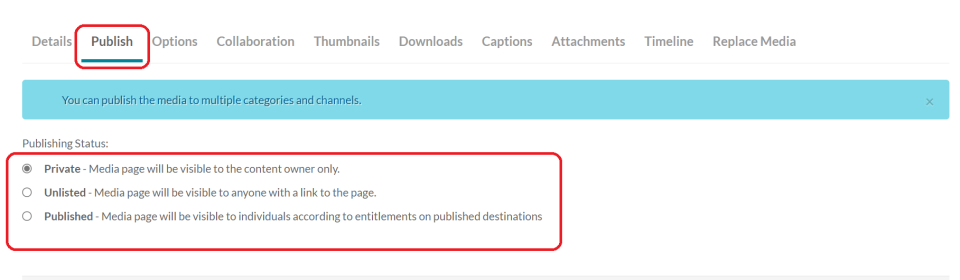
Select the Publish tab under the video. If you want to share the video with others, choose “Unlisted“, which allows sharing via a link, or set the video to “Published” to make it public to everyone. In that case the video can be seen outside Laurea’s organization as well.
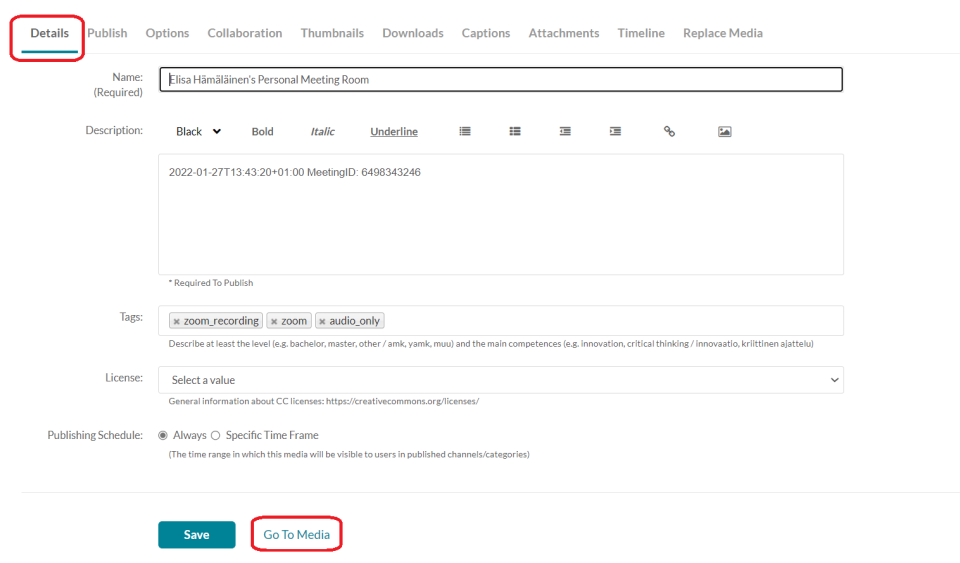
Then go to the Details tab. Here you can change the recording’s title, description and CC licenses. Save the changes you made. Scroll to the bottom of the page and click Go to Media.
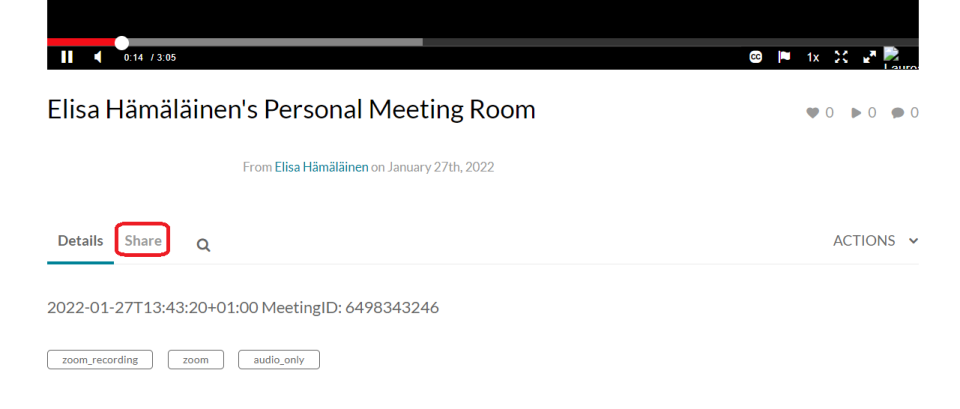
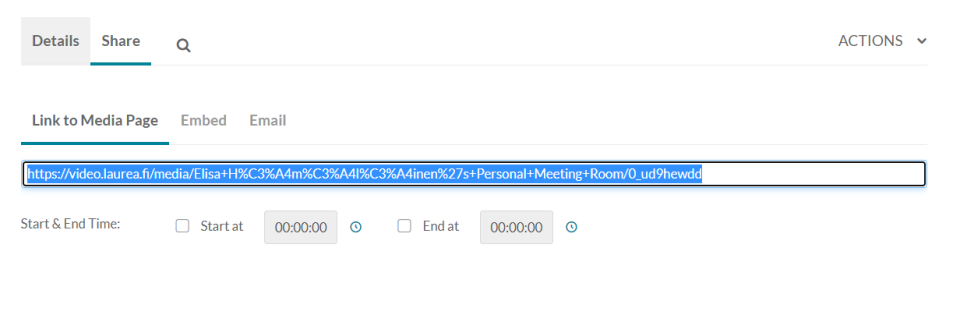
You will reach the media view of the recording. Under the video you will find the Share option.
From here you can copy the recording’s share links for yourself. Under Embed you can get the embed code for the recording.
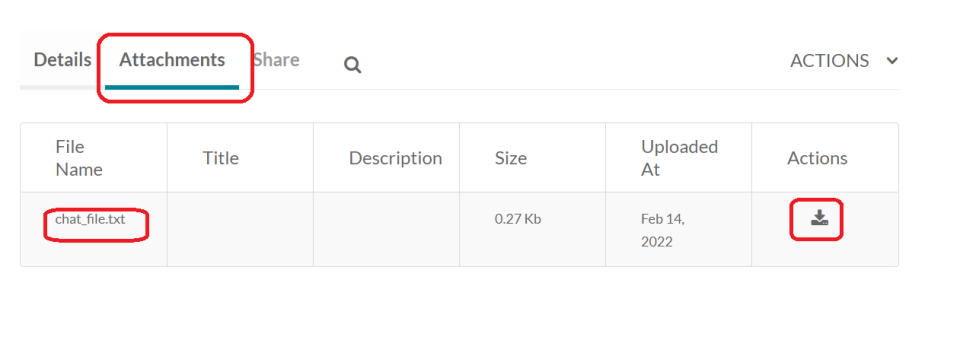
Chat conversations created during the recording can be found under Attachments, and you can download this file to your computer.
Also note the settings for your own recordings in Zoom:
Sign in at https://laurea.zoom.us/
Select Settings from the left and then the Recordings tab:
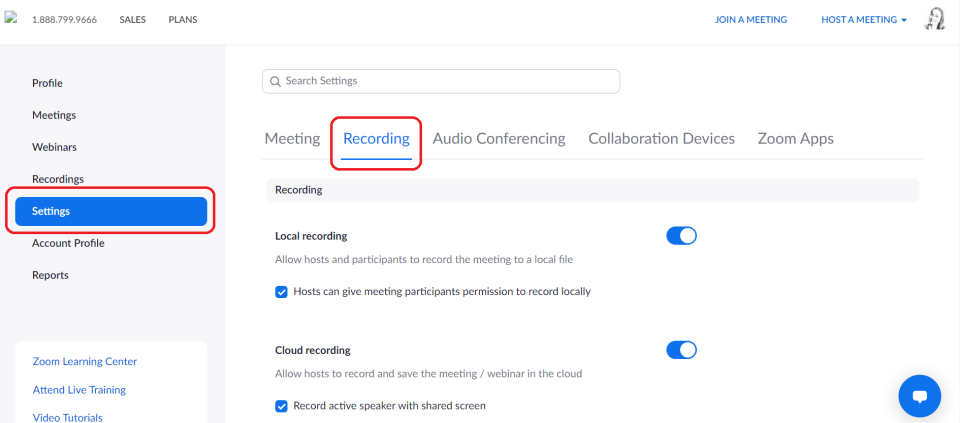
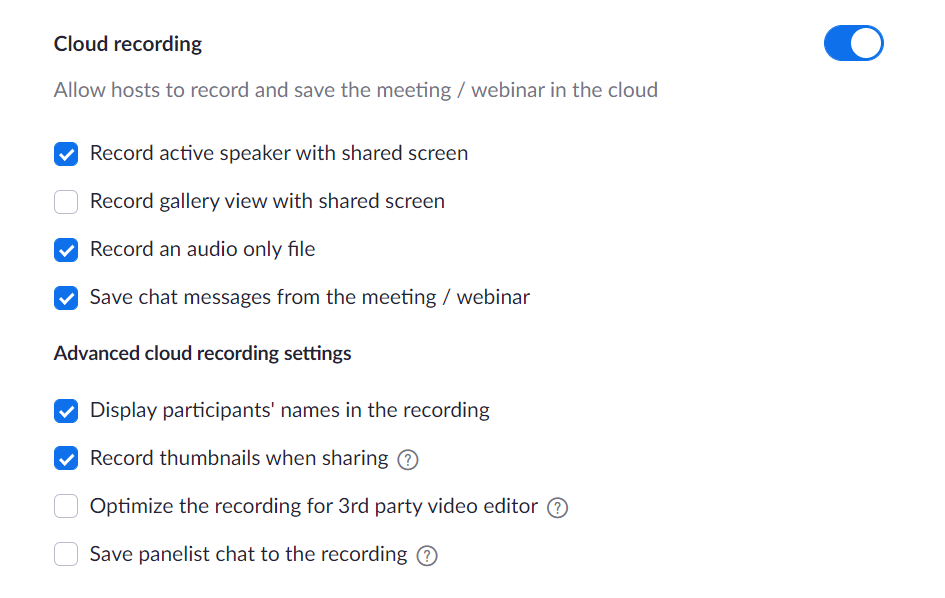
You can affect recordings with the following Zoom settings:
Recording a Zoom meeting to your computer
If you record the meeting directly to your computer, Zoom will process it for playback after the meeting ends.
You must allow Zoom to process the recording, and the processing time depends on the recording length. When the recording is ready, Zoom will automatically open a file manager window to the folder where the recordings are stored:
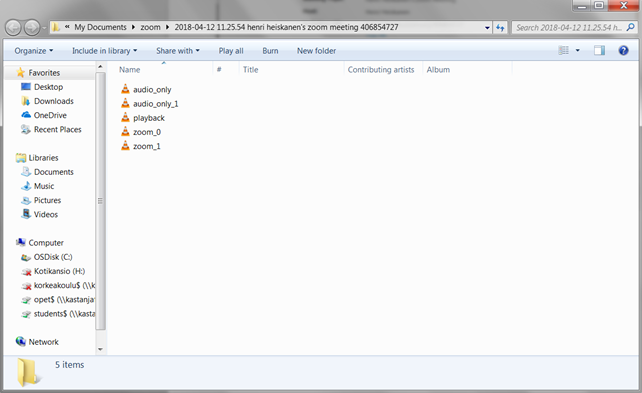
The same meeting always produces both a video recording and an audio-only recording without video. If you record multiple times in the same meeting, Zoom will number the recordings (zoom_0, zoom_1).
You can find the recordings folder later by searching for “zoom” in your file manager, which is the parent folder name for the recordings.
Personal meeting room
Zoom’s own support page on the personal meeting room can be found here.
Each Laurea Zoom user has their own personal meeting room (Personal Meeting Room). The personal meeting room can be entered using a Personal Meeting ID or a Personal Link.
First go to laurea.zoom.us and sign in to your account using the Sign in button:
The Personal Meeting ID is visible on your profile front page:
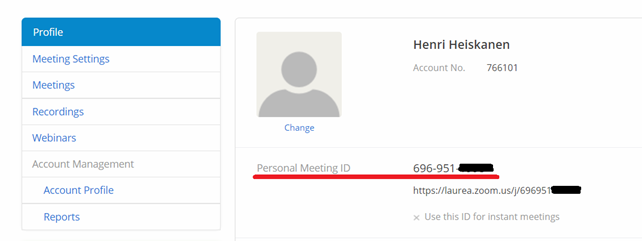
The Personal Meeting ID is a 9–11 digit code that others can use to join your personal meeting room. Under the Personal Meeting ID is the Personal Link, a freely editable personal link that also leads to your meeting room.
You can also share the URL shown under the code so others can join your room directly. By default no one has a personal link; it must be set separately. Click the Customize button (circled in red) to create a personal link:
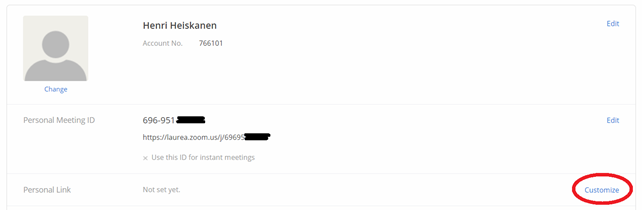
Then enter the desired name for your personal link and click Save Changes to store the modifications:
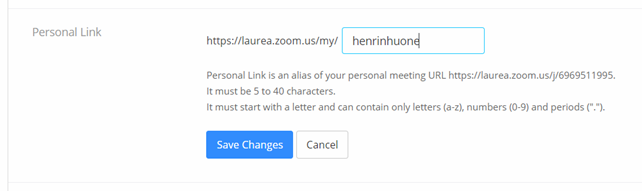
The personal link now appears on your profile front page. After this other people can join your room easily by the memorable name instead of the numeric code.
You can change your personal meeting room settings from the Meetings tab. Then click Personal Meeting Room.

From the view that opens you can edit the meeting from the bottom of the page (Edit this meeting).
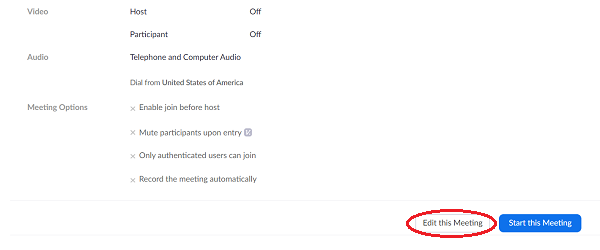
Note! Meetings now require either a passcode or a waiting room.
Webinar
Zoom’s own instructions on webinars can be found here.
With Laurea’s standard Zoom license it is possible to host webinars for up to 500 attendees.
Laurea also has a few licenses that allow webinars for larger audiences. These webinars are essentially Zoom meetings that can host up to 1000 participants and focus on presenters rather than active interaction. If you feel you need to host a 1000-person webinar in Zoom and do not already have permissions, contact servicedesk@laurea.fi.
Creating a webinar
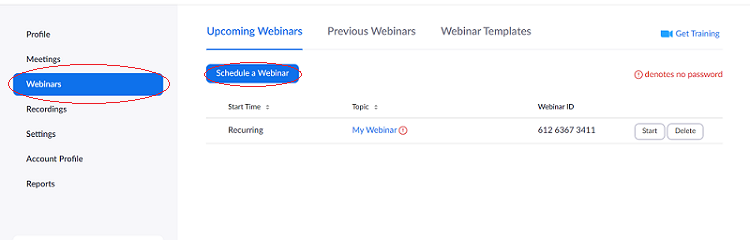
After signing in at laurea.zoom.us (Sign in), webinars can be found behind the Webinars button. From the view that opens click Schedule a Webinar to create and schedule a webinar:
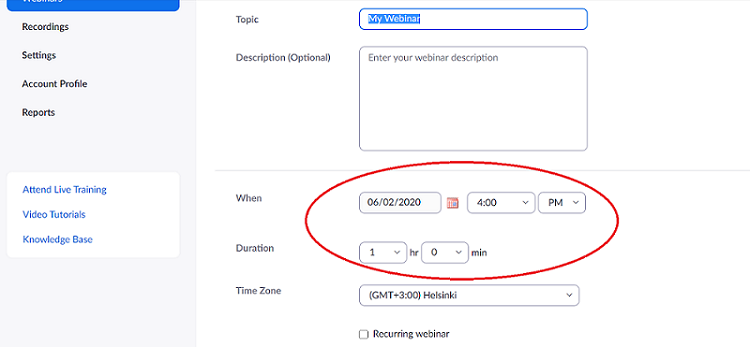
In the view that opens enter a name for the webinar, an optional description, and importantly the webinar’s date and duration:
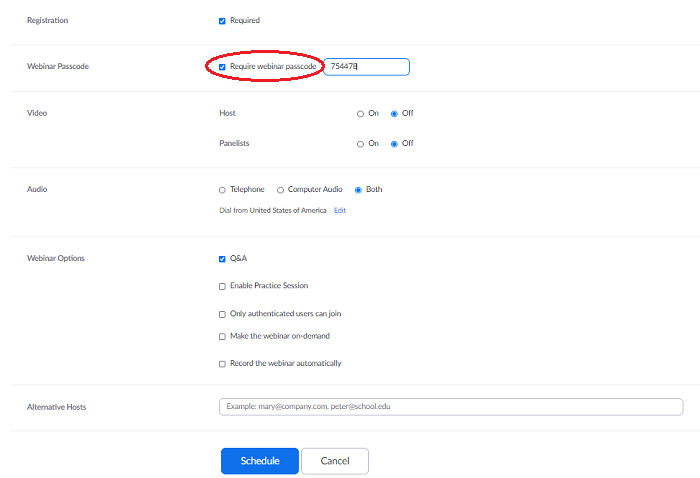
You cannot set a waiting room for a webinar. You can set a passcode for the webinar and it is recommended. After filling in the relevant fields for your webinar, click the Schedule button at the bottom:
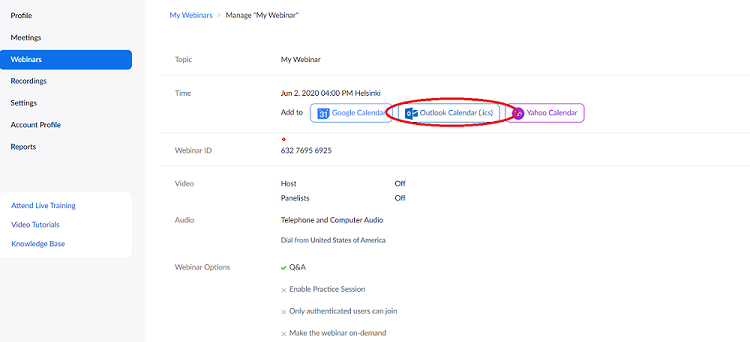
The webinar is then ready to use. You can easily create an Outlook event for the webinar which can be forwarded to participants using the Add to: Outlook Calendar (.ics) button:
To start the webinar click the Start button for the relevant webinar on the Webinars page.

This opens the webinar Zoom room.
Q&A
The webinar Zoom room is almost identical in features to a normal Zoom meeting. The main differences in the interface are the Q&A (Questions & Answers) and Polls buttons at the bottom:
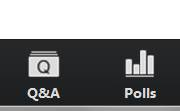
With Q&A participants can pose questions to the presenters, who can then answer either in writing or orally. Written answers are private. The Polls feature allows you to present pre-made questionnaires to participants, and the data is collected on the webinar page in Zoom. Polls work the same way in a normal meeting as in a webinar.
Practice session
The practice session is a temporary space before the webinar where the host, co-hosts and panelists can do last-minute preparations. Attendees cannot access the practice session. You can enable the practice session in the webinar settings. The practice session looks like this:
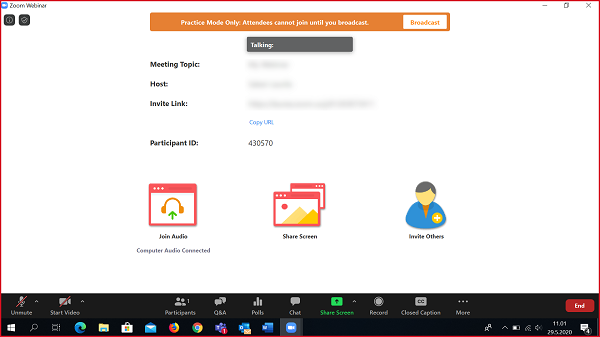
By pressing the broadcast button the webinar begins and attendees can join.
Host, Panelist and Attendee
Unlike a normal meeting where there are two roles for participants (Host and Participant), webinars have three roles: Host, Panelist and Attendee. The webinar Host has the same full rights as a Host in a normal Zoom room. Hosts and co-hosts also act as panelists. Panelists have fewer rights than Hosts: they can share their screen and control their microphone for presentations, but they cannot grant rights to others or change room settings. Attendees correspond to Participants and by default only have chat and Q/A access. Hosts and co-hosts can grant speaking rights to attendees, enabling them to speak aloud.
As a Host you can manage who are Hosts, Panelists or Attendees. To change a participant’s role, click the Participants button in the bottom panel, then select either the Panelists tab (showing hosts and panelists) or the Attendees tab (showing all attendees). Hover over the desired person, click More and then choose the new role:
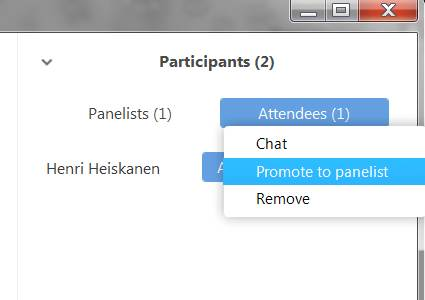
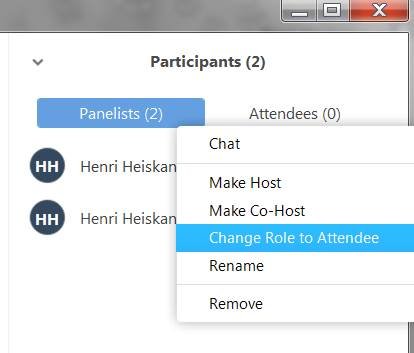
Attendees can be promoted only to Panelists. Once a participant is promoted to a Panelist they can be made a Host or Co-Host in the same way, or moved back to Attendee.
Installing the Outlook add-in
Zoom’s own instructions on this topic can be found here.
Installation (Browser version)
Note! If you install this add-in via the browser, it will automatically appear in the Outlook desktop version on the next application start.
1. Sign in at https://outlook.office.com/owa with your Laurea credentials.
2. From the gear icon in the top-right, choose Manage Add-ins.
3. Type Zoom Scheduler into the search field and select it from the dropdown.
4. Click the “Add” button.
You are ready. Now when you create a calendar entry in the browser you will see a small blue Zoom icon in the top bar.
Outlook desktop version

From the top bar click Store and search for Zoom
If the add-in does not immediately appear in the top bar, restart Outlook.
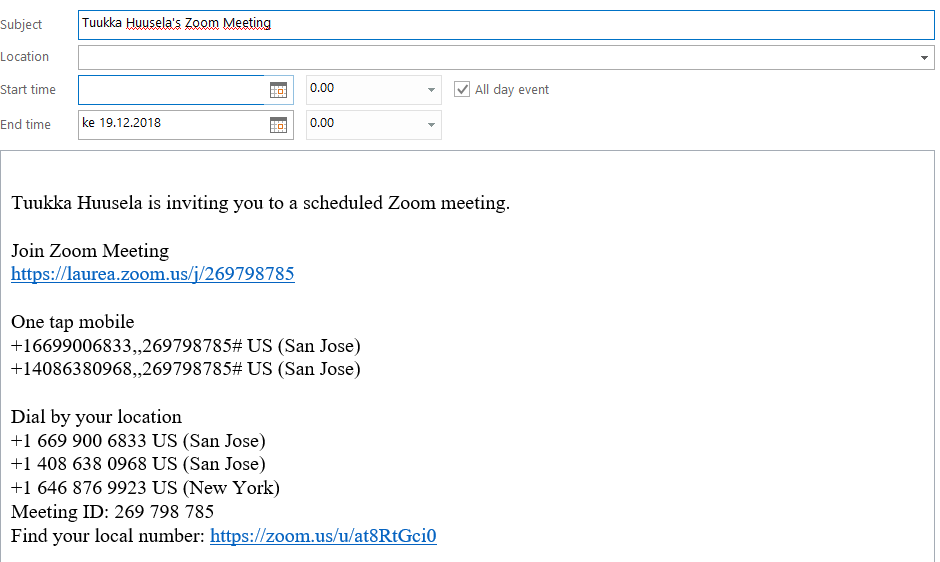
Creating a Zoom meeting
1. Go to the calendar either in the browser or in the app and start creating a new calendar event.
2. Select Zoom Meeting from the top bar.
3. Zoom will likely ask you to sign in. Use SSO sign-in for this. When you select SSO, the app will ask you for the domain name. Enter “laurea”.
4. Choose your desired settings. Decide whether to use a new meeting room or your personal meeting room, set the meeting name and other options.
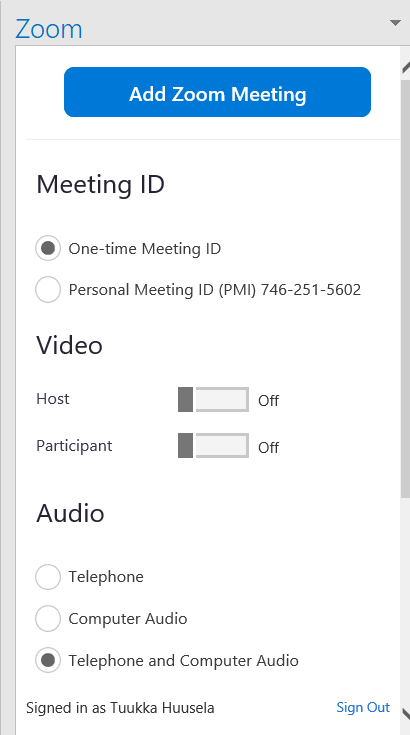
NOTE! Via the Outlook add-in you can create only one-time Zoom meeting rooms or personal meeting rooms. The add-in cannot create recurring meeting rooms.
5. Press Add Zoom Meeting. You are now ready. The calendar entry will look roughly like this:
Alternative host
Instructions on this topic can be found on Zoom’s own pages here.